

DIY Soapstone Countertops on a Budget
- Karissa Barker
- Nov 17, 2025
- 5 min read
How we faked the look of real soapstone in our Butler’s Pantry
**This post contains affiliate links

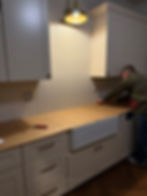
If you’ve ever priced out real soapstone countertops, you know… they are stunning but so expensive. When we remodeled our Butler’s pantry, I wanted that moody, soft-matte, natural-stone look without spending thousands. So we decided to DIY our own soapstone-look countertops and backsplash out of MDF, and honestly? They turned out shockingly realistic.
This entire method is budget-friendly, renter-friendly, beginner-friendly… and pantry-friendly. (This wasn’t in our kitchen, just our Butler’s pantry.) And yes, yes… I know. I got so many comments on social media from people saying MDF won’t hold up. But here’s the truth: laminate countertops—like the 20-year-old ones we ripped out of this fixer-upper—are literally MDF with a laminate layer on top. MDF holds up just fine when sealed correctly.

My dad is truly the mastermind behind making this dream come to life, and i've gotten to build other countertops with him for other projects this way. Usually he pours the stone pattern in the epoxy, but creating a soaptsone look we used a bit of a different method and painted the pattern on first, let it dry, then poured epoxy.
Let’s walk through exactly what we did, what worked, what didn’t, and how you can recreate this look in your own home.
Supply List for DIY Soapstone Counters
(Insert affiliate links)
MDF Sheet
Primer
Sherwin-Williams Iron Ore
Acrylic paint (white + black)
Spray bottle with Water
Plastic card (for veining)
Sandpaper (400 grit) + rollers (SHED FREE!!!)
Step 1: Template Your Countertops (Don’t Skip This!)
Before we cut or painted anything, we templated the entire countertop out of a giant sheet of cardboard. This step saved us. Pantries and kitchens usually have weird corners, outlets, or appliances that need to fit just right, so build your cardboard template, test it, adjust it, then transfer the template to your MDF.
Why cardboard first:
It prevents expensive mistakes
You get a perfect fit
You can visualize the overhang and edging
Once the template fit perfectly, we cut the MDF to match.

Step 2: Prime + Paint the Base Color
We used Iron Ore by Sherwin-Williams as the base color (the perfect deep charcoal that leans a little blue for a soapstone look).
Prime the MDF.
Roll or spray on Iron Ore.
Let it dry completely.
This creates the “stone” base layer that everything else sits on.
Step 3: Study Real Soapstone (and Pinterest!)
Before we added texture, I spent a ridiculous amount of time scrolling Pinterest and zooming in on real soapstone slabs as well as looking at samples in real life.
Look for:
The direction of the grain
The undertones of the coloration (i.e. a slightly blue leaning grey black)
How subtle the veining typically looks
The difference between honed, oiled, and “leathered” textures
This helped me understand the movement and the natural, imperfect patterns of real stone. I HIGHLY recommend doing this so your faux version looks authentic.

Step 4: Practice the Texture on Scrap MDF (This Is Essential)
I’m begging you… practice first.I tried multiple samples before I ever touched the real countertop.
The texture is created with a spray bottle mixture:
Fill a spray bottle with water
Add a couple drops of pure white acrylic paint
Add a couple drops of pure black acrylic paint
Shake it up
This creates a speckled, dusty spray that mimics the mineral flecks in real soapstone.
Spray lightly, let it sit, adjust, and PRACTICE until you like the look. If this step is off, the whole countertop will look fake. Scraps were my best friend here. The water flows a bit and after it dries it looks very realistic.

Side Note: I read in one tutorial to spray the paint mixture and then press plastic bags or plastic wrap onto it to create a leathered, textured finish. I tried it. I strongly disliked it. It didn’t look realistic and felt too forced, almost like marbled craft paper instead of stone.
Skip that.The spray bottle alone gives a more natural, subtle, believable texture.
Step 5: Seal With Stone Coat Epoxy

Once your painted “stone” texture is fully dry, it’s time for epoxy.
We used Stone Coat Epoxy, which is:
Heat resistant
Waterproof
Durable
Perfect for countertops
Follow the instructions (very carefully- be sure you have all materials on hand and you are familiar with the instructions) and pour the epoxy. This is where it starts looking like an actual slab.

Step 6: Create the Soapstone Veining
Soapstone veining is extremely delicate—not like bold marble veining. I wanted that soft, thin, natural movement.
Here’s the trick that worked perfectly:
Spray a plastic piece as thin as a credit card with white spray paint.
While the epoxy is still wet, gently drag the plastic piece through the epoxy.
It creates perfectly thin, soft, wispy veins that look exactly like real soapstone.
Less is more here. One or two subtle veins is all you need.

Step 7: Finish With a Matte Stone Coat Sealer
This final step is what made them look so real.
After the epoxy cured, we added Stone Coat’s matte stone finish sealer. Soapstone in real life has a soft, matte, velvety, slightly textured finish—not a high-gloss shine.
This sealer:
Knocks down the shine
Adds a natural stone texture
Makes everything look realistic
Protects the finish even more
This is the step that took it from “pretty DIY countertop” to “is this real soapstone?!”

Dry Time + Cure Time (Plan Ahead)
A lot of DIY tutorials skip this part, but it matters.
Epoxy needs several full days to dry.
It takes about a week to fully cure.
Don’t set appliances or anything heavy on it until it’s fully cured.
Worth the wait, I promise.
Final Thoughts: Would I Do This Again?
Absolutely.In fact, I’d do it in other parts of the house before ever spending thousands on real soapstone.
The texture, the veining, the soft matte finish… it all comes together to look extremely believable at a fraction of the price.
Want to See the Full Butler’s Pantry Makeover?
Visit the full reveal post here: [Click here for the full before + after tour, product links, and sources!]