

How to DIY a Faux Stone Wall
- Karissa Barker
- Jun 18, 2025
- 3 min read
Updated: Jun 19, 2025
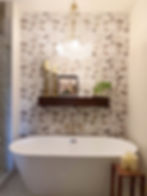
I’m having a “I can’t believe it’s not butter” moment as I upload the pictures for this DIY Stone Wall. These 3D faux stone panels, especially overgrouted, seriously look like rock. We used real stone on our living room fireplace (I’ll include a pic of that), and truly the DIY fake stone looks just as real as the real thing. This DIY is SO easy, and needs very little in terms of experience and tools. I’ll walk you through every step and share mistakes I learned from along the way:
Supplies
3D Rock Wall Panels (obviously). Over order, because there will be some waste with edges/corners.
Joint Compound- buy the big tub.
Razor Knife or Kitchen Scissors- I used kitchen scissors for where I cut around rock, and a razor blade and straight edge for straight line cuts.
Grout Sponge- optional. I used this to clear off excess drywall mud
Instructions/Tips and Tricks
Cut straight edges on the first piece to line it up with the ceiling and edge you’re starting on. I kept the piece I cut off to use as a guide to cut the adjacent panels the same height for the first row.
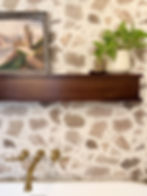
NOTE: If this was a main wall in my home (like dining or living areas), I would cut the panels with scissors and piece them together on the wall irregularly. This would create a more authentic, random "stone" pattern, BUT would create a LOT of waste, so you would need to order far more product. In my opinion even with "overgrout" you can see the lines where the pieces meet up in photos of my bathroom. Truthfully though, in person you can't tell unless you are looking for it.
Add construction adhesive to the back of the panel- only focusing on where the panel will touch the wall.
Stick the panel in place, and run your hands over the “grout” lines on the panel, making sure the whole thing is bonded well to the wall.
Add your next piece!
An important note- if I was doing a larger wall (trying to convince my husband we need this on our bedroom wall wink wink), I would cut the pieces down and mix and match every other row to stagger the pieces a bit so that the grout lines were not so obvious. In person you cannot tell on my bathroom wall that it is indivisible panels, but in photos/vidoes you can make out the panels.
To fill in around tricky spaces, I used kitchen scissors to cut out smaller rocks from the leftovers/waste and glued them individually on.
Use a putty knife and drywall mud to “grout” the rock. Use a “squish and scrape” motion- squish the mud in between the rocks and then scrape off the excess. I opted for an overgrouted look, so after the mud dried I went back over the rock with a wet grout sponge to remove the excess. If you are going for more of a German schmear look, cover up more of the rock with the mud.
That’s it, you’re done! I did seal mine with this because it’s behind my bathtub, but you don’t have to. I also did the same DIY on my bedroom fireplace, pictured below!

Stay tuned for a full how-to video on YouTube of adding the rock panel to my bedroom fireplace.
Shop My Bathroom
Tile
PS- You can absolutelty use the drywall mud method to overgrout other materials as well, like a faux brick panel we used to DIY our fireplace in our last fixer upper:


I used the same method on brick paneling in our bedroom fire place in our first fixer upper pictures too- so easy, inexpensive, and beautiful!
Happy DIYing!